I gotta think that after taking a class the last thing a new trainee to shooting wants to do is dry fire. However, dry fire is the cost efficient way to cement skills. Dry fire is not just blindly pulling the trigger on an empty gun. Dry fire is a slow methodical way to really come to understand what each of the fundamentals is trying to teach us. Dry fire is where we learn the intimate details of our shooting partner. We know the creep of the trigger, the buildup at the wall, and break of the trigger. If we have a firearm with a heavy double action, we learn how to stack the weight of the trigger, and where that sweet spot for the pause rests. With lots of dry fire, stacking becomes just a stop along the way of the journey, and that pause gets minimized until it’s no longer needed. Before we initiate a practice session, take all precautions to insure your gun is unloaded…leave the magazine in another room, and clear the chamber, as we unload remember the four steps. 1. Safety 2. Magazine 3. Chamber 4. Safety.
Dry fire is where we learn what the perfect master grip feels like, and what it takes to repeat that feeling. We want to practice this as soon after getting a proper lesson as we can, preferably that night, or the next day for ten minutes. We want to make sure we are doing it right, so we are not perfecting a less than perfect grip. We start with our trigger finger positioned in what we call the “home”, or “indexed” position along the frame, and the webbing of our thumb as high into the tang as we can position it (without impeding the travel of the slide). I like to scrape the middle finger of my strong hand along the bottom of the trigger guard, before adding the rest of the fingers of my strong hand, and then support hand. We’ll explore the grip in its own blog posting in the coming weeks.
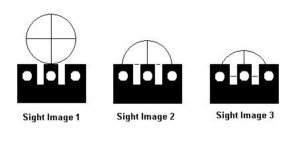
Secondly, let’s tape a target to the wall in our basement or other room where we’ll dry fire. We want a good representation, one that is clear, and consistent. A target that we’ll use to measure our progress against our goals. We want something more than just a “spot” on the wall. As we grip the gun and press it forward, try to pick up the front sight as you “present” your firearm to full extension. As part of this exercise we need to see how our sights work. Which of the pictures above best illustrates how your gun’s sights are supposed to work? Aiming is one of the most important fundamentals (all are important), but if you can keep your sights aligned and on target, while pressing your trigger, you have the skill set to shoot accurately.
Third, take a breath, exhale, hold. Place your trigger finger across the face of the trigger. Your trigger should drop in to the middle of the last pad on your trigger finger. If it doesn’t drop there easily, your gun might not fit your hand well. Look at adding\removing or changing back-straps, or frame module sizes. Align the sights first, and then obtain the proper sight picture, add your trigger finger, slowly press the trigger to the rear. The gun dry fires. 2 questions you ask yourself. Did my sights stay on target? Did my focus stay on the front sight? Exhale, breathe. Obviously, your answer should be “yes” to both questions.
Finally, after a “dry shot”, and your questions answered, keep the trigger pinned to the rear of its travel motion, and operate the slide with your support hand. After the slide returns to battery and your grip reacquired, start releasing the trigger. Release the trigger only to the point of its audible, or tactile, reset. You should still feel tension on your trigger finger. This is as far as you should be releasing the trigger, unless you intend to stop shooting. Now you are at the top of “the wall” and with the shortest trigger travel distance to release the next shot. Repeat this trigger exercise for 5 to 10 minutes. Mastering the trigger is an easy lesson to convey, but a difficult lesson for the shooter to fully comprehend and implement. While many shooters can hammer on the trigger and do it well, but they didn’t start out that way, and only through a mastery of grip and aiming have they arrived at that place.
I’m an addict to the Dot Torture target, and that target has been a gateway target to more drills and skills. However, I love going home to Dot Torture. Once mastering the 3 yard position, I taped a DT on the wall through my office door. I can sit at my basement office desk and aim through the door at my target 8 yards away. During conference calls in which I’m mostly listening, I’ll run dry fire practice with the phone on mute. It was through “Dry Firing” of the DT exercises that allowed me to successfully shoot the drill at 4, 5 and 6 yards in a matter of 2 months. I got stuck at 7 yards, and had forsaken Dry Fire practice. Once I realized this error and went back to regular Dry Fire practice, I was able to blow through 7, 8 and 9 yards in a three month span. Dry fire practice is not just for new shooters, and when done slowly, and thoughtfully, dry fire practice can yield great results.
If you are a data junkie, look into the Mantis series of laser trainers. These products allow you to collect your entire arc of motion while performing dry fire, and provide you with the instant feedback you crave. The Mantis series adds an additional layer of data, knowledge and gives you the visual queues so many of us need to learn.
In short, not every successful shooting session starts at the range. When your goals are to improve your trigger press, draw stroke, first shot accuracy, or any of a number of other goals, you can get a head start practicing in the comfort of your own home without ammunition.